Saturday, September 26, 2009

How to enable the Genius Gpen 560 pen tablet in Ubuntu

Getting a Gpen 560 to work in Ubuntu Intrepid and Jaunty is easy. It is recognized as an Aiptek tablet. So get the aiptek driver by opening a terminal (or using synaptic) and typing:

sudo apt-get install xserver-xorg-input-aiptek


Open a text editor and create a file and save it as 10-aiptek.fdi .

You'll need to type the following code in the file, but don't copy and paste the code below because you might copy html codes needed to display it in Blogger. Instead download the 10-aiptek.fdi.zip file (0.38 kb) and extract it somewhere.


<?xml version="1.0" encoding="UTF-8"?> <!-- -*- SGML -*- -->

<deviceinfo version="0.2">
<device>
<match key="info.product" contains="Aiptek">
<merge key="input.x11_driver" type="string">aiptek </merge>
<merge key="input.x11_options.SendCoreEvents" type="string">true </merge>
<merge key="input.x11_options.Type" type="string">stylus </merge>
<merge key="input.x11_options.Mode" type="string">absolute </merge>
<merge key="input.x11_options.zMin" type="string">0</merge>
<merge key="input.x11_options.zMax" type="string">1024</merge>
</match>
</device>
</deviceinfo>

cd to where you downloaded the file 10-aiptek.fdi and change the owner of the file by typing, then copy it to /usr/share/hal/fdi/policy/20thirdparty:

sudo chown root:root 10-aiptek.fdi

sudo cp 10-aiptek.fdi /usr/share/hal/fdi/policy/20thirdparty


plug in the gpen tablet.


Making the tablet work in Gimp

Open Gimp. Click Edit->Preferences.
Select Input Devices in the left panel of the Preferences dialog box.
Click on Configure Extended Input Devices...

In the Configure Input Devices dialog box, click the Device: dropdown menu. Aiptek should appear in the list. Select that and in Mode: select Screen. Hit Save and have fun.

In Blender it works like a charm. All buttons work.


For further information see this page: https://help.ubuntu.com/community/AiptekTablet
Sunday, September 6, 2009

Stopmotion animation with a webcam in UbuntuStudio

The Stopmotion software for stop motion animation is included in the distribution of UbuntuStudio. The demo here was done with UbuntuStudio 8.04 based on Intrepid.

I used an A4Tech web cam which is v4l2. Stopmotion has a problem with these kind of web cameras so you'll need to follow Aearenda's solution here: http://ubuntuforums.org/showthread.php?t=931208 . I do hope they've already solved this in Ubuntu Jaunty 9.04.

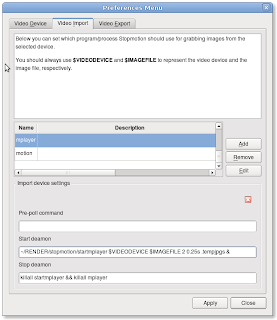
Create an mplayer video import device in Stopmotion


Start Stopmotion and in the menu find settings->configure stopmotion or ctrl-P.

Click add button.

Resize the dialog box to see the start deamon & stop deamon text boxes.

Click video import tab.

In the start deamon text box enter the following (change the ~/RENDER/stopmotion/ folder with your preference):

~/RENDER/stopmotion/startmplayer $VIDEODEVICE $IMAGEFILE 2 0.25s .tempjpgs &


In the stop deamon text box enter this code:

killall startmplayer && killall mplayer


Download my startmplayer file from: http://www.mediafire.com/file/zm2ytmnqa2j/startmplayer.zip.

Extract this startmplayer file in the ~/RENDER/stopmotion/ folder, you can change this folder.

Then follow this demo:


Finished product (a bit crude):

Friday, September 4, 2009

Taking a break on proyektong halo-halo.

I currently taking a break on this project because of my research assignments for my courses in Masters of Distance Education. I will try to catch up later.
 
Creative Commons License
This work is licensed under a Creative Commons Attribution-Share Alike 3.0 Unported License.