Friday, May 29, 2009

Test pose for dirty rat.


Working with the mesh deform modifier is difficult because it cause some unwanted deformations. In this model, I had to exclude the arms from the mesh deformer because it was flattening out the arms. Perhaps this is the reason why the Big Buck Bunny characters had a python script for keeping the volume of the arms.

Wednesday, May 27, 2009

Mesh deformer of daga

This is the first time I'll be using the mesh deform modifier. Here is the cage of the dirty rat.


Monday, May 25, 2009

Final mesh for Daga

This first render was done in gelato.


The rest are blender internal render.


Sunday, May 17, 2009

Node material setting of Pagong's body and render


Pagong blend file, minor upgrade to 1.1

Minor upgrade to Pagong (turtle). I forgot to parent the blinker bones to the head, so it's now corrected. I also tried to reduce the specularity of the shell.


Download link: Pagong 1.1 (7.67 MB)

License info

Pagong's mesh, rig, and textures are licensed under Creative Commons Attribution-Share Alike 3.0 Unported License. Please document any modifications in the text info file.

Includes footroll.py from http://graphicall.org/bbb/chars/pyconstraints/footroll.py which is
copyright Blender Foundation|www.bigbuckbunny.org | http://www.bigbuckbunny.org/index.php/about/. footroll.py python script is licensed under Creative Commons Attribution 3.0 (http://creativecommons.org/licenses/by/3.0/).

Friday, May 15, 2009

Pagong blend file release 1.0

Announcing my first release of Pagong (turtle). Mesh, rig, and textures are licensed under Creative Commons Attribution-Share Alike 3.0 Unported License. Please document any modifications in the text info file.

Includes footroll.py from http://graphicall.org/bbb/chars/pyconstraints/footroll.py which is
copyright Blender Foundation|www.bigbuckbunny.org | http://www.bigbuckbunny.org/index.php/about/. footroll.py python script is licensed under Creative Commons Attribution 3.0 (http://creativecommons.org/licenses/by/3.0/).

This turtle is a character in my halo-halo project animation. It makes use of multiple materials that are vertex assigned and node materials. You can even consider it a walking demo for blender 2.48 materials and textures.

Download link

Pagong 1.0 (7.67 MB)

Enjoy :-)

Wednesday, May 13, 2009

How to create a normal map in Gimp for Blender 2.48a, Part III

Step 3. Using the normal map in Blender

3.1 Go back to blender or reopen your previous blend file.

3.2 Hit F5-key or Shading button. Then click on materials button.

3.3 Add a new material to your mesh. I renamed mine "normapMAT"


3.4 Hit F6-key or Texture button. Add a new texture.


3.5 Under texture type select "Image"

3.6 In the image buttons group, click on the load button. One of the blender windows will turn into a File browser. Select your normal map e.g. UVnormap1.tga. It's a good practice to turn on "Relative paths". Click the "Select image" button.


3.7 In the "Map Image" buttons group. Enable "Normal Map", then select "Tangent". I also enabled "Extend" and under "Image buttons" "Premul".


3.8 Go back to the materials buttons (hit the button with red sphere). Click on the "Map To" near the Texture tab. Disable "col" and enable "nor" (Text will turn white if enabled and black disabled, yellow if inverse)


That's it. Hit F12 and render your results. Make sure you have a camera and lights.

Add Image

Rendered result


Blend File

http://www.mediafire.com/file/1340t0mtvvd/normaptest.blend.zip (263.23 kb)


Links

Cocidius' info on the normal map plugin

How to create a normal map in Gimp for Blender 2.48a, Part II

Step 2. Creating a normal map in Gimp

2.1 Open the UVnormap file in Gimp. Btw. Blender will append the name of the mesh object to the name of the uv map so mine is named UVnormap_Plane.tga.

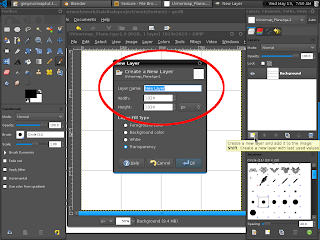
2.2 Create a new layer where we will draw the texture.


2.3 Draw textures. I did mine with black, white and grayscale. But you can use color, I'm just not sure how the normal map plugin will interpret it. You can actually use photo textures.

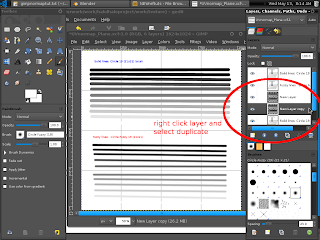
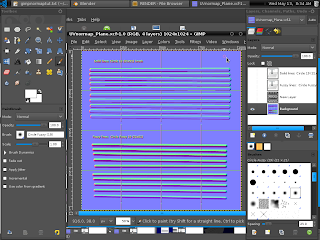
2.4 To study the effect of using different gray tones I drew solid lines on half the plane using Circle brush 19 (21x21). And on the other half, fuzzy lines with Circle fuzzy brush 19 (21x21).


2.5 After you've drawn you're texture click on 
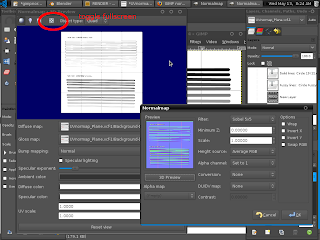
menu->Filters->Map->Normalmap.


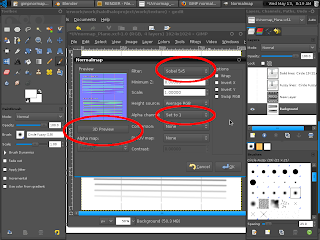
2.6 A dialog box will appear. For my turtle texture I've set Filter: Sobel 5x5. And set Alpha channel to "Set to 1", although this might not have any effect. Supposedly it uses the value of a grayscale image (but my image is RGB since the normalmap plugin will not work on grayscale mode).


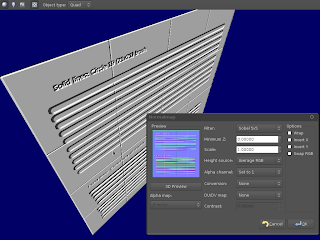
2.7 You can preview the effect of the normalmap by clicking "3D Preview" button. A window will appear which you can toggle to fullscreen. You can grab and turn around the preview to look at the effect by right clicking and dragging the image. You can changed settings and the preview will reflect the changes. When your happy with the effect click "OK". Your drawn image should turn blue.


2.8 So you can edit your map again save as an .xcf file first. Then click File->Save A copy... . Give your normal map image a .tga extension. Mine is named UVnormap1.tga

Note: Remember that you can also change the height of the bump or depression in Blender, and you can even invert it later on, so you don't really have to tweak too much here.

That's the end of step 2. We now have a normal map, we can use in Blender.

How to create a normal map in Gimp for Blender 2.48a, Part I

Step 1. Create a UV map in Blender

1.1 Split your window into a 3d view window and a UV/image editor window

1.2 Create a new image
a. With your cursor in the UV/image editor hit Alt-N or select Image*->New.


b. A dialog box will appear with settings. Usual settings are 512, 1024, 2048. The larger the image the more memory will be used by Blender.


c. You may need to select your new image by clicking on the up/down arrow and selecting "Untitled".


d. You may rename your untitled image by clicking on the text box and when it turns red or whatever color your theme is set to, just type in a new name. I renamed mine "UVnormap".


1.3. Unwrap your UV
a. In the 3d view window select your mesh (I have here a plane scaled up and subdivided twice)and go into edit mode by hitting tab-key if you are in object mode or select from the menu.

b. Press a-key to select all vertices/line/faces (the lines should turn yellow, and the faces pink).


c. Hit U-key or select Mesh->UV Unwrap in the 3d view menu. I just selected "Unwrap". The UV mapping will appear in the UV/Image editor window.


1.4 Export your UV
a. Move your cursor on the UV/Image editor window and click on UVs->Scripts->Save UV Face Layout... in the menu.


b. A dialog box will appear and you may need to change size. Here I used 1024 pixels. Then hit OK.


c. One of the windows will turn into a File browser window. Select your folder to save the targa file. Type the name of your file e.g. UVnormap. Then click Save UV (tga). You can also save it as SVG if you selected that in UV export dialog box.


That's the end of Step one. We will now temporarily leave blender and open Gimp to work on the UV map.
 
Creative Commons License
This work is licensed under a Creative Commons Attribution-Share Alike 3.0 Unported License.